Windows直接使用ssh dynamic port forwarding作为proxy:修订间差异
来自三线的随记
(创建页面,内容为“Currently the SOCKS4 and SOCKS5 protocols are supported, and ssh will act as a SOCKS server. Only root can forward privileged ports(< 1024) . <br /> === 在能…”) |
小无编辑摘要 |
||
| (未显示同一用户的3个中间版本) | |||
| 第3行: | 第3行: | ||
<br /> | <br /> | ||
=== 在能够与proxy节点通讯的terminal上执行'''(以下不同option根据需求选择)''' === | ===在能够与proxy节点通讯的terminal上执行'''(以下不同option根据需求选择)'''=== | ||
ssh -D {localPort} username@host | ssh -D {localPort} username@host | ||
| 第9行: | 第9行: | ||
启用compression: | 启用compression: | ||
ssh -CD [localListenAddress:]{localPort } username@host | ssh -CD [localListenAddress:]{localPort } username@host | ||
-N Do not execute a remote command. This is useful for just forwarding ports. | |||
-N Do not execute a remote command. This is useful for just forwarding ports. | |||
ssh -ND [localListenAddress:]{localPort } username@host | ssh -ND [localListenAddress:]{localPort } username@host | ||
<br /> | <br /> | ||
=== windows配置直接使用sock代理 === | ===windows配置直接使用sock代理=== | ||
====method 1==== | |||
打开 Internet Explorer | 打开 Internet Explorer | ||
| 第21行: | 第25行: | ||
在下方找到 LAN settings(局域网设置) | 在下方找到 LAN settings(局域网设置) | ||
进入 LAN settings 页面以后 选择 Advanced (高级) | |||
在Socks处写上对应的socks proxy地址和端口 | |||
可参照如图设置,并且确定保存设置即可配置成功 | 可参照如图设置,并且确定保存设置即可配置成功 | ||
[[文件:Windows-sock.png|无|缩略图|800x800像素]] | [[文件:Windows-sock.png|无|缩略图|800x800像素]]<br /> | ||
====method 2==== | |||
[[文件:Windows-sock-proxy-method2.png|无|缩略图|822x822像素]] | |||
| 第29行: | 第39行: | ||
<br /> | <br /> | ||
[[分类:Windows]] | [[分类:Windows]] | ||
[[分类:SSH]] | |||
2022年3月29日 (二) 14:20的最新版本
Currently the SOCKS4 and SOCKS5 protocols are supported, and ssh will act as a SOCKS server. Only root can forward privileged ports(< 1024) .
在能够与proxy节点通讯的terminal上执行(以下不同option根据需求选择)
ssh -D {localPort} username@host
ssh -D [localListenAddress:]{localPort } username@host
启用compression:
ssh -CD [localListenAddress:]{localPort } username@host
-N Do not execute a remote command. This is useful for just forwarding ports.
ssh -ND [localListenAddress:]{localPort } username@host
windows配置直接使用sock代理
method 1
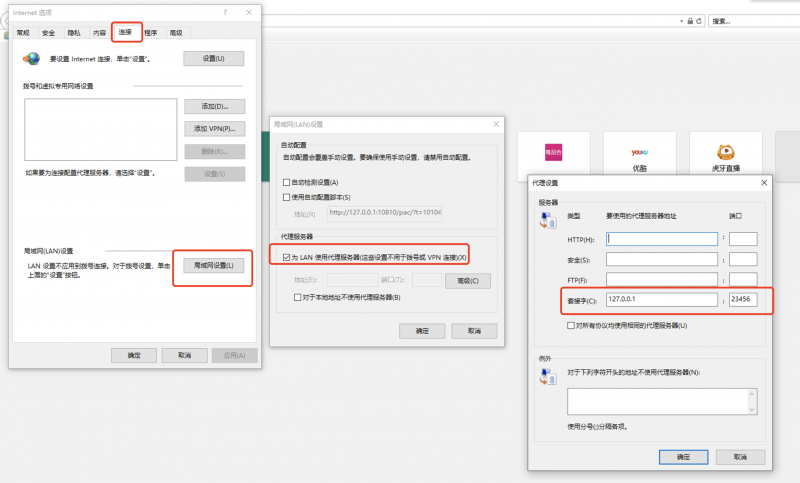
打开 Internet Explorer
找到 Internet Options (Internet settins)
进入 Connections(连接) 选项卡
在下方找到 LAN settings(局域网设置)
进入 LAN settings 页面以后 选择 Advanced (高级)
在Socks处写上对应的socks proxy地址和端口
可参照如图设置,并且确定保存设置即可配置成功

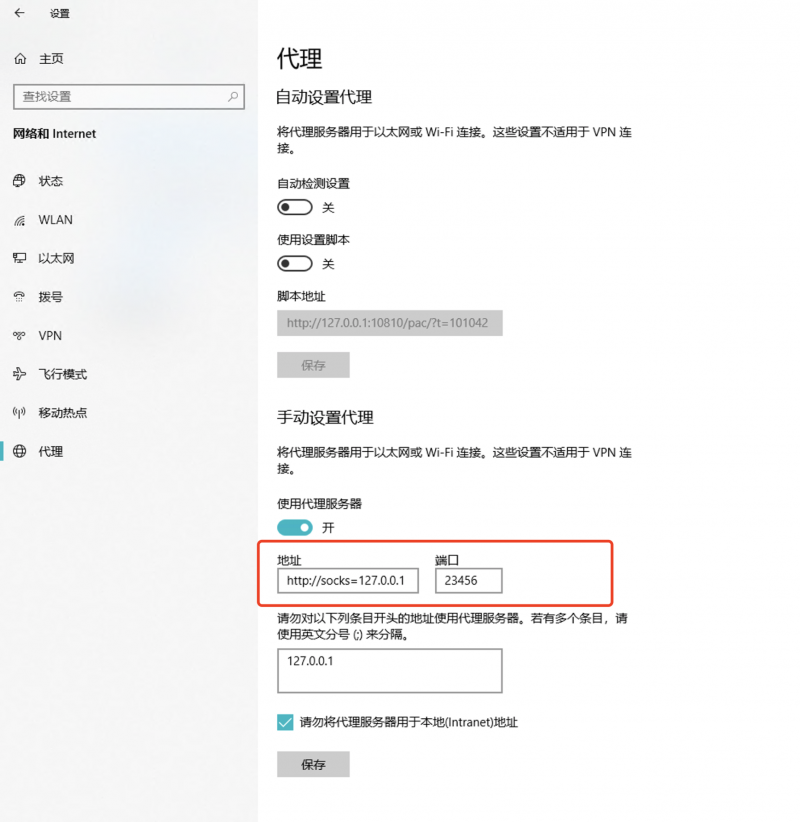
method 2
